
یکی از بهترین مثالهای فریمورک MVC، الگوی معماری (Model-View-Controller)، فروشگاه ساز اپن کارت است که پوشههای مجزا برای controller، model، view و language فراهم میکند. هنگام ساخت ماژول جدید در اپن کارت، باید با مفاهیم پایهای این پلتفرم آشنا باشید. این آشنایی به شما کمک میکند ماژولهایی بسازید که با ساختار و مشخصات اپن کارت همخوانی داشته باشند. برای کشف مبانی این پلتفرم، به مستندات اپن کارت مراجعه کنید. ساختار دایرکتوری اپن کارت ساختار مشخصی است که باید هنگام ساخت ماژول به آن پایبند باشید.
بنابراین، برای شروع توسعه ماژول در اپن کارت، باید فایلهایی در پوشه ماژول controller، language و view ایجاد کنید. مقادیر ماژول در اپن کارت در جدولی (تیبل) به نام setting ذخیره میشوند، که هنگام ایجاد فایل model نیازی به آن ندارید. فایل admin->model->setting->setting.php شامل کوئریهایی برای ذخیره تنظیمات در جدول setting است.
اطلاعات عمومی
ابتدا با توسعه ماژول در نسخه 7.3.0.3 اپن کارت آشنا میشویم. بخش comment کدهایی که ارائه میدهیم شامل اطلاعات توسعه و تغییرات انجام شده در پاسخ به تغییرات نسخههای دیگر است.
سرفصل مطالب
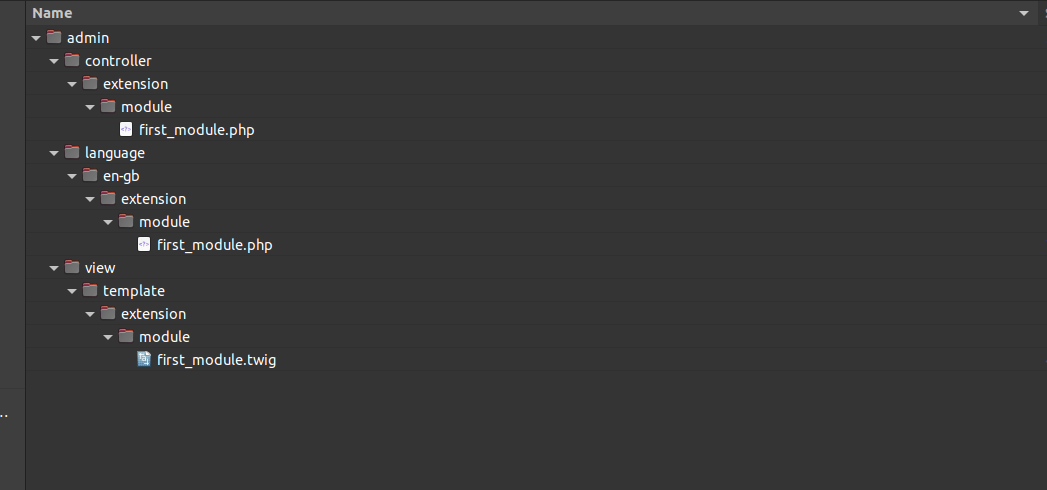
ساختار اپن کارت
باید ساختار پوشه زیر را دنبال کنید:
ایجاد فایل language برای ماژول اپن کارت
فایل language برای ماژول ‘first_module.php’، در ابتدا ایجاد شده و در پوشه admin->language->fa-ir->extension>module قرار میگیرد. برای نسخه 7.3.0.3 اپن کارت، از این مسیر استفاده کنید.
زبانها (عبارات متنی) در این فایل به ایندکسهای یک آرایه تخصیص داده میشوند. نام این آرایه _$ است، بنابراین این نکته را در نظر داشته باشید. زبان مورد نیاز برای ایجاد ماژول در اینجا ارائه شده است.
<?php
/**
 * Webkul Software.
 *
 * @category Webkul
 * @package Opencart Module Tutorial
 * @author Webkul
 * @copyright Copyright (c) Webkul Software Private Limited (https://webkul.com)
 * @license https://store.webkul.com/license.html
 */
// Heading
$_['heading_title']    = 'ماژول اول';
$_['text_module']      = 'ماژول ها';
$_['text_success']     = 'ماژول اول" با موفقیت تغییر یافت"';
$_['text_edit']        = 'ماژول اول" با موفقیت ویرایش شد"';
// Entry
$_['entry_status']     = 'وضعیت';
// Error
$_['error_permission'] = 'هشدار: دسترسی برای تغییر "ماژول اول" وجود ندارد';
ایجاد فایل controller برای ماژول اپن کارت
پس از ایجاد فایل language، به سراغ controller میرویم. بنابراین، در پوشه admin->controller->extension->module، فایلی با نام first_module.php ایجاد میکنیم.
در اینجا، کد controller به همراه comment ارائه شده است.
<?php
/**
 * Webkul Software.
 *
 * @category Webkul
 * @package Opencart Module Tutorial
 * @author Webkul
 * @copyright Copyright (c) Webkul Software Private Limited (https://webkul.com)
 * @license https://store.webkul.com/license.html
 */
/**
 * The controller class must extend the parent class i.e. Controller
 * The controller name must be like Controller + directory path (with first character of each folder in capital) + file name (with first character in capital)
 */
class ControllerExtensionModuleFirstModule extends Controller {
    /**
     * property named $error is defined to put errors
     * @var array
     */
    private $error = array();
    /**
     * Basic function of the controller. This can be called using route=module/first_module
     */
    public function index() {
        /**
         * Loads the language file. Path of the file along with file name must be given
         */
        $this->load->language('extension/module/first_module');
        /**
         * Sets the title to the html page
         */
        $this->document->setTitle($this->language->get('heading_title'));
        /**
         * Loads the model file. Path of the file to be given
         */
        $this->load->model('setting/setting');
        /**
         * Checks whether the request type is post. If yes, then calls the validate function.
         */
        if (($this->request->server['REQUEST_METHOD'] == 'POST') && $this->validate()) {
            /**
             * The function named 'editSetting' of a model is called in this way
             * The first argument is the code of the module and the second argument contains all the post values
             * The code must be same as your file name
             */
            $this->model_setting_setting->editSetting('module_first_module', $this->request->post);
            /**
             * The success message is kept in the session
             */
            $this->session->data['success'] = $this->language->get('text_success');
            /**
             * The redirection works in this way.
             * After insertion of data, it will redirect to extension/module file along with the token
             * The success message will be shown there
             */
            $this->response->redirect($this->url->link('extension/module', 'user_token=' . $this->session->data['user_token'], true));
        }
        /**
         * Putting the language into the '$data' array
         * This is the way how you get the language from the language file
         */
        $data['heading_title'] = $this->language->get('heading_title');
        $data['text_edit'] = $this->language->get('text_edit');
        $data['text_enabled'] = $this->language->get('text_enabled');
        $data['text_disabled'] = $this->language->get('text_disabled');
        $data['entry_status'] = $this->language->get('entry_status');
        $data['button_save'] = $this->language->get('button_save');
        $data['button_cancel'] = $this->language->get('button_cancel');
        /**
         * If there is any warning in the private property '$error', then it will be put into '$data' array
         */
        if (isset($this->error['warning'])) {
            $data['error_warning'] = $this->error['warning'];
        } else {
            $data['error_warning'] = '';
        }
        /**
         * Breadcrumbs are declared as array
         */
        $data['breadcrumbs'] = array();
        /**
         * Breadcrumbs are defined
         */
        $data['breadcrumbs'][] = array(
            'text' => $this->language->get('text_home'),
            'href' => $this->url->link('common/dashboard', 'user_token=' . $this->session->data['user_token'], true)
        );
        $data['breadcrumbs'][] = array(
            'text' => $this->language->get('text_module'),
            'href' => $this->url->link('extension/module', 'user_token=' . $this->session->data['user_token'], true)
        );
        $data['breadcrumbs'][] = array(
            'text' => $this->language->get('heading_title'),
            'href' => $this->url->link('extenison/module/first_module', 'user_token=' . $this->session->data['user_token'], true)
        );
        /**
         * Form action url is created and defined to $data['action']
         */
        $data['action'] = $this->url->link('extension/module/first_module', 'user_token=' . $this->session->data['user_token'], true);
        /**
         * Cancel/back button url which will lead you to module list
         */
        $data['cancel'] = $this->url->link('extension/module', 'user_token=' . $this->session->data['user_token'], true);
        /**
         * checks whether the value exists in the post request
         */
        if (isset($this->request->post['module_first_module_status'])) {
            $data['module_first_module_status'] = $this->request->post['module_first_module_status'];
        } else {
        /**
         * if the value do not exists in the post request then value is taken from the config i.e. setting table
         */
            $data['module_first_module_status'] = $this->config->get('module_first_module_status');
        }
        /**
         * Header data is loaded
         */
        $data['header'] = $this->load->controller('common/header');
        /**
         * Column left part is loaded
         */
        $data['column_left'] = $this->load->controller('common/column_left');
        /**
         * Footer data is loaded
         */
        $data['footer'] = $this->load->controller('common/footer');
        /**
         * Using this function tpl file is called and all the data of controller is passed through '$data' array
         * This is for Opencart 2.2.0.0 version. There will be minor changes as per the version.
         */
        $this->response->setOutput($this->load->view('extension/module/first_module', $data));
    }
    /**
     * validate function validates the values of the post and also the permission
     * @return boolean return true if any of the index of $error contains value
     */
    protected function validate() {
        /**
         * Check whether the current user has the permissions to modify the settings of the module
         * The permissions are set in System->Users->User groups
         */
        if (!$this->user->hasPermission('modify', 'extension/module/first_module')) {
            $this->error['warning'] = $this->language->get('error_permission');
        }
        return !$this->error;
    }
}
با استفاده از کد فوق، میتوانید نحوه بارگذاری languageها، modelها و موارد دیگر را یاد بگیرید و از آنها استفاده کنید.
ایجاد فایل view برای ماژول اپن کارت
پس از controller، باید به سراغ فایل view برویم. بنابراین، فایلی به نام first_module.twig در پوشه admin->view->template->extension->module ایجاد میکنیم.
در اینجا کد فایل view ارائه شده است.
<!--
/**
* Webkul Software.
*
* @category Webkul
* @package Opencart Module Tutorial
* @author Webkul
* @copyright Copyright (c) Webkul Software Private Limited (https://webkul.com)
* @license https://store.webkul.com/license.html
*/
-->
<!-- merging the 'header' and 'column left' part with this template -->
{{ header }}{{ column_left }}
<div id="content">
<div class="page-header">
<div class="container-fluid">
<div class="pull-right">
<!-- Form submit button -->
<button type="submit" form="form-first-module" data-toggle="tooltip" title="{{ button_save }}" class="btn btn-primary"><i class="fa fa-save"></i></button>
<!-- Back button -->
<a href="{{ cancel }}" data-toggle="tooltip" title="{{ button_cancel }}" class="btn btn-default"><i class="fa fa-reply"></i></a></div>
<!-- Heading is mentioned here -->
<h1>{{ heading_title }}</h1>
<!-- Breadcrumbs are listed here -->
<ul class="breadcrumb">
{% for breadcrumb in breadcrumbs %}
<li><a href="{{ breadcrumb.href }}">{{ breadcrumb.text }}</a></li>
{% endfor %}
</ul>
</div>
</div>
<div class="container-fluid">
<!-- if it contains a warning then it will be visible as an alert -->
{% if error_warning %}
<div class="alert alert-danger"><i class="fa fa-exclamation-circle"></i> {{ error_warning }}
<button type="button" class="close" data-dismiss="alert">×</button>
</div>
{% endif %}
<div class="panel panel-default">
<div class="panel-heading">
<h3 class="panel-title"><i class="fa fa-pencil"></i> {{ text_edit }}</h3>
</div>
<div class="panel-body">
<!-- form starts here -->
<form action="{{ action }}" method="post" enctype="multipart/form-data" id="form-first-module" class="form-horizontal">
<div class="form-group">
<!-- Entry label is mentioned here -->
<label class="col-sm-2 control-label" for="input-status">{{ entry_status }}</label>
<div class="col-sm-10">
<!-- The name of the form inputs must start with the controller file name followed by a underscore
like in this case "module_first_module_" after that status is added -->
<select name="module_first_module_status" id="input-status" class="form-control">
{% if module_first_module_status %}
<option value="1" selected="selected">{{ text_enabled }}</option>
<option value="0">{{ text_disabled }}</option>
{% else %}
<option value="1">{{ text_enabled }}</option>
<option value="0" selected="selected">{{ text_disabled }}</option>
{% endif %}
</select>
</div>
</div>
</form>
</div>
</div>
</div>
</div>
<!-- merges the footer with the template -->
{{ footer }}بنابراین، بخش کدنویسی ماژول را به پایان میرسانیم. اکنون باید به افزونه ها->ماژول ها مراجعه کنید، جایی که میتوانید “ماژول اول” را در لیست ماژولها ببینید. از آنجا میتوانید ماژول را نصب کرده و سپس تنظیم کنید.
مراحل نصب و تنظیم ماژول اپن کارت
برای دیدن ماژول جدیدی که در حال ساخت آن هستید، پس از افزودن و ایجاد همه فایلها، باید مراحل زیر را دنبال کنید.
مرحله 1: لطفاً اجازه دسترسی و تغییر عملکرد و ویژگیهای ماژول را بدهید. با مراجعه به سیستم->کاربران->گروه های کاربری.
مرحله 2: پس از ارائه دسترسی لازم به ماژول، اکنون باید به ماژول بروید. با مراجعه به افزونه ها->افزونه ها و کلیک بر روی نوار انتخاب برای دریافت ماژول.
مرحله 3: پس از دیدن ماژول در لیست ماژولها، باید با کلیک بر روی دکمه نصب، آن را نصب کنید.
مرحله 4: پس از نصب موفقیتآمیز، ماژول را با کلیک بر روی دکمه ویرایش ویرایش کنید و سپس ویژگیها و عملکرد ماژول را مشاهده خواهید کرد که در آنجا میتوانید نیازها را طبق علاقه خود تنظیم کنید.